Lottery DApp 개발 Lottery React웹 프론트[3]
web3js - filter

React 를 실행하기 위해
npm -g install create-react-app
설치해 준 후 lotery-react-web폴더를 만들어 준다.
create-react-app lotery-react-web
yarn을 사용해 주기 위해 설치해준다.
npm install –global yarn
그 후 yarn에 web3를 추가해준다.
cd lotery-react-web yarn add web3
yarn start 하면 웹페이지가 열린다.
lotery-react-web의 scr에 있는 App.js를 수정해 우리의 가나슈와 메타마스크를 연동시켜보자.
metamask web3 라고 구글링해서 코드를 긁어서 넣어준다.
import Web3 from ‘web3’;
그래도 긁어서 넣어주면 오류가 발생한다.
최대한 오류를 고쳐주면 밑과 같은 코드가 된다.
    if (window.ethereum) {
      console.log('recent mode');
      this.web3 = new Web3(window.ethereum);
      try {
          // Request account access if needed
          await window.ethereum.enable();
          // Acccounts now exposed
          //this.eth.sendTransaction({/* ... */});
      } catch (error) {
          // User denied account access...
          console.log('user denied account access error: ' + error);
      }
  }
   // Legacy dapp browsers...
    else if (window.web3) {
     console.log('legacy mode');
       this.web3 = new Web3(window.web3.currentProvider);
       // Acccounts always exposed
        //web3.eth.sendTransaction({/* ... */});
   }
    // Non-dapp browsers...
    else {
     console.log('Non-Ethereum browser detected. You should consider trying MetaMask!');
   }
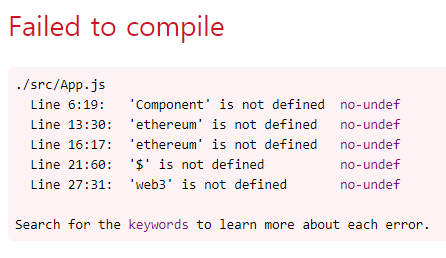
하지만 오류가 발생한다.
강의에서 보는 App.js와 초기 코드는
class App extends Component
인데 이 대로 코드를 작성하면 component가 정의되지 않았다는 에러가 떴다.
다시 에러를 수정
전체 코드는
import React from 'react';
import logo from './logo.svg';
import './App.css';
import Web3 from 'web3';

function App() {
  componentDidMount = async () => {
    await this.initWeb3();
  }
  initWeb3 = async () => {
    if (window.ethereum) {
      console.log('recent mode');
      this.web3 = new Web3(window.ethereum);
      try {
          // Request account access if needed
          await window.ethereum.enable();
          // Acccounts now exposed
          //this.eth.sendTransaction({/* ... */});
      } catch (error) {
          // User denied account access...
          console.log('user denied account access error: ' + error);
      }
  }
   // Legacy dapp browsers...
    else if (window.web3) {
     console.log('legacy mode');
       this.web3 = new Web3(window.web3.currentProvider);
       // Acccounts always exposed
        //web3.eth.sendTransaction({/* ... */});
   }
    // Non-dapp browsers...
    else {
     console.log('Non-Ethereum browser detected. You should consider trying MetaMask!');
   }
 }
  return (
    <div className="App">
      <header className="App-header">
        <img src={logo} className="App-logo" alt="logo" />
        <p>
          Edit <code>src/App.js</code> and save to reload.
        </p>
        <a
          className="App-link"
          href="https://reactjs.org"
          target="_blank"
          rel="noopener noreferrer"
        >
          Learn React
        </a>
      </header>
    </div>
  );
}

export default App;
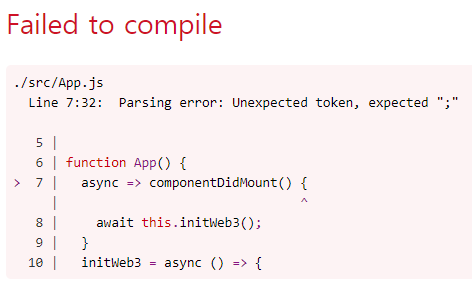
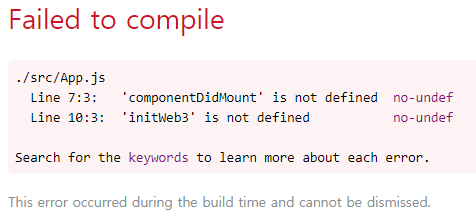
또 다시 오류
그래서 강의에 나온 그대로 코드를 따라 써보았다. import부분과 class를 바꿔주었다.
import React, { Component } from 'react';
import logo from './logo.svg';
import './App.css';
import Web3 from 'web3';

class  App extends Component {

  componentDidMount = async () => {
    await this.initWeb3();
  }
  initWeb3 = async () => {
    if (window.ethereum) {
      console.log('recent mode');
      this.web3 = new Web3(window.ethereum);
      try {
          // Request account access if needed
          await window.ethereum.enable();
          // Acccounts now exposed
          //this.eth.sendTransaction({/* ... */});
      } catch (error) {
          // User denied account access...
          console.log('user denied account access error: ' + error);
      }
  }
   // Legacy dapp browsers...
    else if (window.web3) {
     console.log('legacy mode');
       this.web3 = new Web3(window.web3.currentProvider);
       // Acccounts always exposed
        //web3.eth.sendTransaction({/* ... */});
   }
    // Non-dapp browsers...
    else {
     console.log('Non-Ethereum browser detected. You should consider trying MetaMask!');
   }
 }
 render(){
  return (
    <div className="App">
      <header className="App-header">
        <img src={logo} className="App-logo" alt="logo" />
        <p>
          Edit <code>src/App.js</code> and save to reload.
        </p>
        <a
          className="App-link"
          href="https://reactjs.org"
          target="_blank"
          rel="noopener noreferrer"
        >
          Learn React
        </a>
      </header>
    </div>
  );
 }
}

export default App;
내 메타마스크와 React연동 성공!
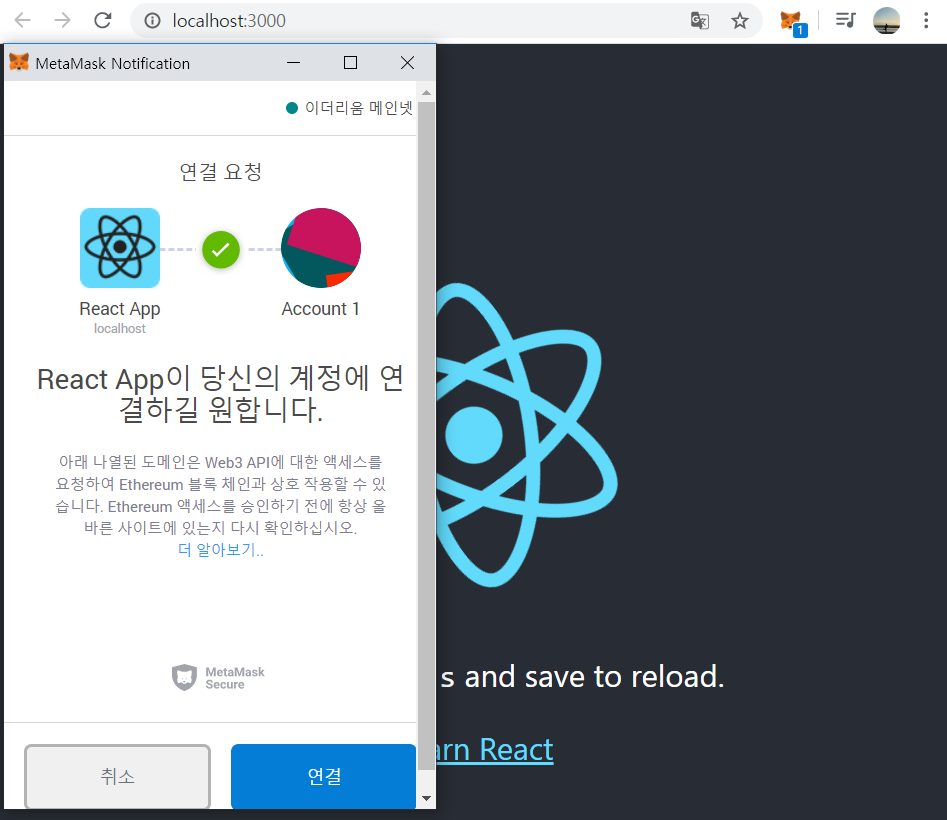
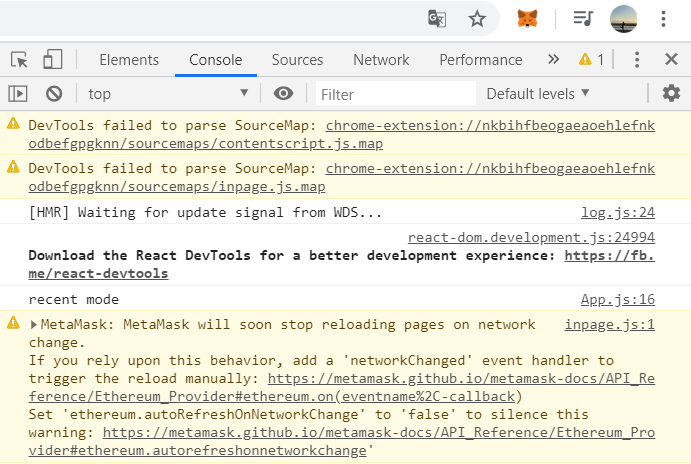
##연동 테스트 이젠 실제로 사용할 수 있는지 테스트해보자
componentDidMount = async () => {
    await this.initWeb3();
    console.log(this.web3);
    let accounts = await this.web3.eth.getAccounts();
    console.log(accounts);
  }
이 부분을 수정해주면
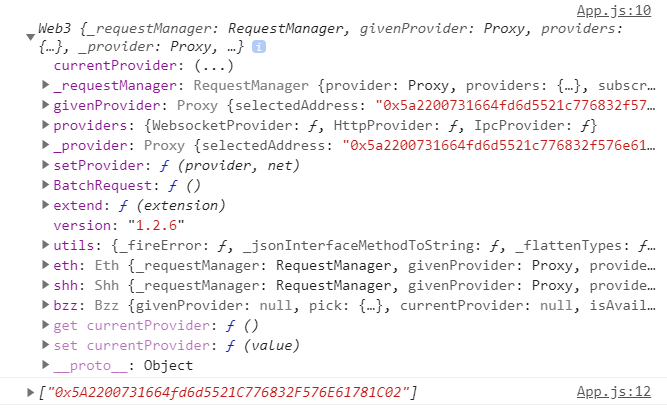
web3와 메타마스크에서 현재 선택한 account를 출력해준다.
가나슈와 연동을 하기 위해서는 메타마스크 네트워크를 가나슈 호스트인 8545로 바꿔준다.
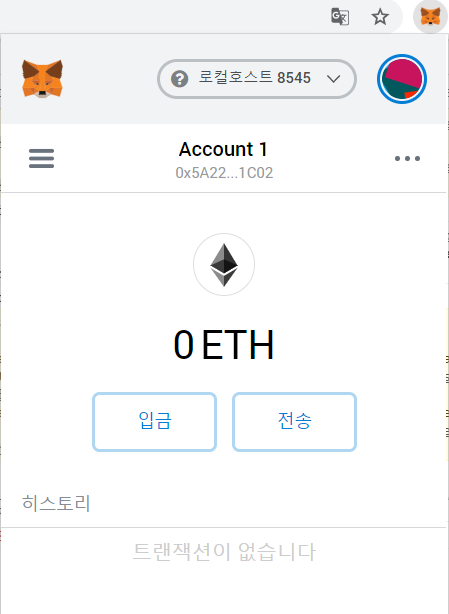
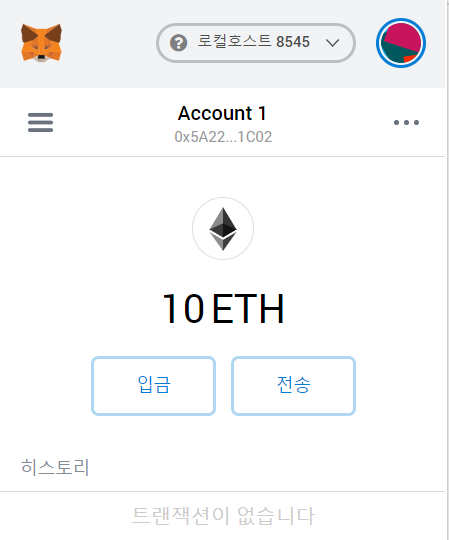
0 ETH인 것을 확인했으니 한번 10 eth를 넣어보자.
truffle console로 들어 가준 후 변수화 해준다.
Lotery.deployed().then(function(instance){lt=instance})
가나슈 acoount중에서 하나를 뽑아내고 변수 ac1에 넣어준다.
web3.eth.getAccounts() let ac1 = ‘0x7901d3c08a66315ADB075B36DE2f111E77A5fC78
ac1에서 메타마스크로 에더를 보낸다.
web3.eth.sendTransaction({from:ac1, to:’0x5A2200731664fd6d5521C776832F576E61781C02’, value:10000000000000000000})
status가 true로 뜨는 것을 확인했으니 돈이 보내진 것을 확인할 수 있다.

account가 list로 받아오므로 getBalance함수 안에 accounts[0]을 넣어준다.
componentDidMount = async () => {
    await this.initWeb3();
    console.log(this.web3);
    let accounts = await this.web3.eth.getAccounts();
    console.log(accounts);
    let balance = await this.web3.eth.getBalance(accounts[0]);
    console.log(balance);
  }

web3js - filter
web3js - send & call
React js 환경 설정
Distribute 함수설계 & 테스트
Distribute 함수설계 & isMath함수 구현 및 테스트
Bet 함수 구현&테스트
Bet 함수 구현&테스트
Lotery domain과 queue설계
Lotery 를 테스트할 테스트 파일을 test폴더 안에 만들어준다.
왜 제목이 안보이지; 너무어렵다 블로긍 ㅠㅡㅜ 다들 맥으로 설명해오앵애ㅐㅐㅐㅐㅐㅐㅐㅐㅐㅐ